Alle Beiträge von ralF selbst

Rundreise von Feldspur bis Regelspur

Es war mal wieder an der Zeit, neue – und alte – Eisenbahnen zu besuchen.
Also habe ich mich am vergangenen Wochenende auf den Weg gemacht, in Nagold, Nürnberg, Nördlingen und Neresheim ein paar schöne, ungewöhnliche oder/und interessante Eisenbahnmotive zu finden.

Die erste Station war das Altensteigerle Denkmal in Nagold, dem ehemalige Ausgangspunkt der Schmalspurbahn Nagold – Altensteig. Das Denkmal ist mit Regel- und schmalspurigen Fahrzeugen, typischen Gleisanlagen, Signalen und Rollbockgrube sehr aufwendig gestaltet.
Von Nagold ging meine Tour weiter nach Horb, das dortige Museum war aber leider geschlossen und das Gelände – selbst für ein starkes Teleobjektiv – unzugänglich.

Nach einer entspannten Nacht ging es dann am nächsten Tag zuerst nach Nürnberg zur Feldbahn 500. Hier ließen sich auf dem weitläufigen Gelände einige interessante Motive finden. Auf der oberen Ebene, auf der auch der Dampfzug seine Runden dreht, waren deutliche Reste von Sturmschäden zu sehen und die große Abstellanlage war daher auch komplett zurück gebaut.
Leider musste ich hier in Nürnberg auch die einzige echte Enttäuschung meiner Tour erleben. Bis zu meinem letzten Besuch war die Ausstellungshalle offen und frei zugänglich. Das hat sich mit dem Argument geändert, dass „man so seine schlechten Erfahrungen mit Kindern gemacht habe“ und daher Zutritt nur noch bei Führungen sei.
Zugegeben, viele Kinder lernen und kennen heute aus missverstandenen „Kinderrechten“ kein nein mehr, und auch zahlreiche Erwachsene und Eltern sind nicht bereit, Vorsichtsmaßnahmen, Regeln oder Einschränkungen zu akzeptieren … aber deswegen ein Museum mit eigentlich robusten Ausstellungsstücken zu einer geschlossenen Veranstaltung zu machen, halte ich für das falsche Signal.

Nach einem kurzen Mittagessen ging es also etwas früher und mit ein paar „fehlenden“ Fotos weiter nach Nördlingen. Ich war sehr gespannt, welche Motive ich im nicht-schmalspurigen Bayerisches Eisenbahnmuseum finden würde. Aber siehe da, nicht nur dass meine erklärte Lieblingslok, die bayerische S3/6 im Schuppen stand, auch so fand sich manch interessanter Ein- und Anblick.
Zum Abschluss des Tages kam ich dann auf dem Rückweg ins Filstal noch in Neresheim vorbei. Hier ist der Ausgangspunkt der Härtsfeld-Museumsbahn. Auf Nachfrage durfte ich mich frei auf dem Betriebsgelände bewegen und so ließen sich auch hier nochmal ein paar interessante Motive finden.

Nun aber (fast) genug der Worte … lass Bilder sprechen 🙂

It’s been time again to visit some new – and old – railroads and railroad museums.
So last weekend I hit the road, and tried to find some nice, odd, and/or interesting railroad subjects to shoot in Nagold, Nuremberg, Nördlingen, and Neresheim.

My first stop was at the Altensteigerle Monument in Nagold. Nagold was the lower terminus of the former narrow gauge railroad from Nagold to Altensteig. This monument is elaborately designed showing several pieces of standard, and narrow gauge rolling stock, all standing on trackage laid out in prototype fashion, resembling part of a station complete with signals, and even a carrier truck pit.
From Nagold I went on to Horb. Sadly the railroad museum was closed, and the complete area enclosed and surrounded by trees. Therefore it was neither accessible, nor could I take some photos with my long telephoto lens.

Following a relaxed night the next day’s first destination was the Feldbahn 500 museum in Nuremberg. This museum has two levels connected by an incline, with the main exhibition building on the lower, and an operable layout, and some more static equipment on the upper level. Although part of the upper exhibition area had been cleared – obviously due to recent storm damage – there still could be found some interesting subjects.
Sadly the museum changed some of its policy. The main exhibition building is now longer open to the public, but can onlyy be entered during a few guided tours. The museum justified this with „negative experiences they made with visiting children“.
It is true, that – at least in Germany – many children due to misunderstood „children’s rights“ never learned to accept a no, and also today numerous parents or adults are unwilling to accept precautions, rules or restrictions. But I don’t think that it is the correct consequence to lock a by nature sturdy exhibitiuon away from public access.

So following a short lunch, and with a little less photos taken, I was on the road again, heading for Nördlingen. I was very curious about what photogenic scenes I’ll find at the non-narrow-gauge Bavarian Railroad Museum. But lo and behold, there was not only one and another interesting in/sight, but also I met my other declared love – railroad related 🙂 – when I saw the Bavarian S3/6 express steam locomotive resting in the engine house.
During my way back to the Fils‘ Valley I rounded off my day with a last stop in Neresheim. There is the home of the narrow gauge Härtsfeld-Museum_Railway. On request I was allowed to feel free moving around anywhere on the railroad ground. So I could find some interesting final scenes to photograph.

But now (nearly) enough of words … say more with images 🙂


Fotografisch war das Ziel der Rundfahrt vor Allem, technische Details von Nietverbindungen zu klären und für den Modellbau zu dokumentieren.
Daher entstanden zwar einige Detailaufnahmen, aber weder spezielle Makroaufnahmen noch Bilder mit besonderem „künstlerischen“ oder technischen Anspruch. Dennoch sind ein paar Aufnahmen entstanden, die sowohl für den technisch Interessierten, als auch für den Modellbauer interessant sein dürften.

It was the primary photographic goal of my round trip to sort out several technical details with riveting and have them documented for future modeling tasks.
Therefore I indeed took some detailed views, but those were neither typical close-ups, nor did they follow any special „artistic“ or technical requirements. Nonetheless some of the images are well worth to be shown to those interested in technical details generally or for their model building.


Tür eines Gn Cassel – Nagold
Door on a „Gn“-class boxcar – Nagold


Zahn des Laternenaufzugantriebs … und mein „Gorilla“ bei der Arbeit 🙂 – Nagold
Gear tooth of the lantern elevator’s dive … and my „Gorilla“ at work 🙂 – Nagold


Details an einem Förderkorb – Nürnberg
Detail view of a mine cage – Nuremberg


Das obere End mit Seilbremse an einem weiteren Förderkorb – Nürnberg
The upper part with cable rake on another mine cage – Nuremberg


Sicherheitskupplung an einem Grubenhunt – Nürnberg
Safe-coupler on a mining car – Nuremberg


Kein Eisenbahnausflug ohne Dampflok – Nürnberg
No trip visiting railroads without a steam engine – Nuremberg


Muldensperre – Nürnberg
Tipper latch – Nuremberg


Umspuren beim Vorbild: 600mm Brigadewagen auf 500mm Spurweite – Nürnberg
WW-I light railway gondola regauged from 23-5/8″ to 19-11/16″ gauge – Nuremberg


Bevor es mit den Bildern weiter geht, hier ein kleines Extra 🙂
Before continuing with the images have a look at this special 🙂


Interaktives Drehscheiben-Panorama, Nördlingen
Interactive Turntable-Panorama, Nördlingen


Meine Liebe … unter den Dampfloks: Bayerische S3/6 – Nördlingen
My love … railroad related: Bavarian S3/6 – Nördlingen


Es folgen vier Bilder verschiedener Kesselnietungen an Lokkesseln (rostig) und Kesselwagen (lackiert) – Nördlingen
Next are four images of various rivet arrangements on a locomotive boiler (rusty), and a tankcar (painted) – Nördlingen


Defekt – Nördlingen
Out of order – Nördlingen


Für Durchblicker – Nördlingen
Through the valve chest – Nördlingen


Alt und rostig – Neresheim
Old’n’rusty – Neresheim


Es ist noch genug Arbeit übrig – Neresheim
Still enough work to be done – Neresheim


Ein reizvoller Umbau eines Rollbocks – Neresheim
An appealingly rebuilt carrier truck – Neresheim


Habe fertig …
End of …


Alle Inhalte sofern nicht anders vermerkt / unless otherwise noted, any content: © ralf-mit-f, Ralf Schreiner

Retrospektive / Looking back

Der erste „echte“ Artikel für 3 ohne F ist ein Rückblick auf die eine oder andere Modellbau und Konstruktionsarbeit der vergangenen Jahre.
Nach langem Sessel-Modellbau habe ich mir vor knapp 10 Jahren einen CO2-Schneidlaser mit Servo-Antrieben von GCC geleistet. Damit habe ich verschiedene Bausätze gefertigt und damals auch zum Verkauf angeboten. Darunter waren neben Waggons und Ausstattungsdetails als Erstlingswerk ein Klohäuschen in verschiedenen Ausführungen:

This first „typical“ entry under the 3 without F heading will be a look back on one or another modeling and construction work of recent years.
Some 8 years ago the age of arm-chair modeling ended with the purchase of a GCC 40W servo driven lasercutter. I used ths lasercutter for my low volume production manufacturing and selling various wood kits. Beneath my first piece, an outhouse in both European and American styles, the kits ranged from rolling stock to scenery details:


Neben der Herstellung von Holzbausätzen war der Laser auch ein willkommenes Werkzeug, um zukünftige Ätzteile zunächst aus Papier und Karton zu schneiden und so vorab ihre Funktion und Passform zu testen.

The lasercutter was not only usefull for kit production, but also helped in the design of kits from etched sheet brass: Cutting the proposed etching from cardboard was an easy and economical way to check for snug fit and function before „toying“ with acids.


Nachdem der Laser das „respektable“ Alter von knapp 3 Jahren erreicht hatte, wurde deutlich, dass auch ein höherer Preis keine Haltbarkeitsgarantie ist … der Laser fiel nach mehreren kleinen Defekten schließlich mit einem Controller- und Antriebsschaden aus. Da eine Reparatur auch durch den altersbedingten Leistungsverlust der Laserröhre wirtschaftlich nicht sinnvoll war, habe ich mich von dem Laser wieder getrennt.
Statt dessen habe ich dann getestet, ob eine 2,5D CNC-Fräse das Benötigte – zuverlässiger – leisten kann, war aber mit den Ergebnissen nicht wirklich zufrieden.
Daher habe ich für mich beschlossen, zukünftig Modellbau „nach alter Schule“ zu betreiben und (möglichst) alles von Hand zu bauen. Lediglich der fein auflösende 3D-Druck soll als moderne Technik beim Erstellen von Urmodellen Verwendung finden dürfen.

Da ich nicht der große Lötmeister bin, werde ich nur in Ausnahmefällen Messing-, Kupfer-, oder Neusilber-Feinbleche verwenden. Statt dessen kommt, auch dank der guten Erfahrungen mit den Ätzblech-Simulationen, neben Holz vor Allem Karton als „Blechersatz“ zur Verwendung. Wo Gussteile erforderlich sind, werden diese aus Weißmetall oder Bronze bestehen, auf Zink-haltige Legierungen (Messing) möchte ich verzichten, da ich im offenen Tiegelofen schmelze, bzw. in der Flamm-Schleuder gieße und mir dabei zuviel Zinkschnee entsteht.
Kunststoff wird maximal da Verwendung finden, wo seine Isolationseigenschaften erforderlich sind. Selbst ACA-Kleber will ich mittelfristig durch „historische“ Klebstoffe und Versiegelungen ersetzen.

Der erste Schritt in Richtung (mehr) Karton im Modellbau war dann die für den privaten Modellbau freie „Neuauflage“ des europäischen Klohäuschens in Spur N (1:160), als Papier-Baubogen zum Selbstdrucken:

After the lasercutter reached the „decent“ age of nearly three years, it became obvious, that a higher price not necessarily comes with higher durability … following several minor failures finally the main board and part of the servo drives packed up. Since a repair was no more economical, the laser tube already had lost about 25% of its power, I returned the lasercutter.
Instead of cutting with light, I tried to cut with knives and rotary tools on my 2.5D CNC mill. The results not really satisfied me.
Therefore I concluded to give up with digital aid in modeling, and decided that my futore modeling will be old school, returning to mostly hand-crafted modeling. The only digital technology I will use further on is high resolution 3D prints (SLA) to facilitate the construction of complex master patterns.

Since I am not the master of soldering, I will use brass, copper, or nickel-silver sheet only exceptionally. Instead of sheet metal I will use wood and what’s more, cardboard as replacement, especially after the positive experience simulating etched brass with laser cut cardboard. For cast parts I will rely on white metal, or bronze, while passing on any Zinc-containing alloys like brass. Using Zinc-containing alloys would result in an excess risc of zinc fever, as I am melting in an open crucible and casting in an open centrifugal flame casting machine.
I will use plastics only if I must utilize its insulation properties. Even ACA glue, used mostly to harden cardboard and paper, will be banned in the medium term, and shall be replaced by more „historic“ glues, sealants, and varnishes.

The first step in this new direction to preferably using cardboard in my modeling was the re-issue of my N-scale (1:160) kit of a European style outhouse. This kit is designed for home-printing on heavy paper, and is offered as a free download for personal use.


Download:
Klohäuschen Baubogen 1:160 / Outhouse Heavy Paper Kit 1:160

Inzwischen neigt sich auch die aktuelle, berufsbedingte Modellbau-Pause dem Ende entgegen. Damit kann das nächste Projekt starten:
Natürlich wieder ein Klohäuschen, diesmal aus Holz und Karton, in der US-Version in meinem angestammten Maßstab 1:48, 1/4″ Scale …
… demnächst mehr.

In the meantime my modeling had to take an occupational brake. Since this finally comes to an end, I soon can start a new project:
Again an outhouse, but this time made from cardboard and wood, American style, and in my favorite 1/4″ scale, 1:48 …
… stay tuned for more to come.

Nach der Pause / After a Year’s Break

Nach einem Jahr Zwangspause an der Schmiede konte ich im Juni das Feuer endlich wieder anheizen.
Zum Warm-Schmieden war erst mal die „große“ Esse dran, da sie ein elektrisches Gebläse hat. Sie braucht zwar wegen ihrer tiefen Feuerschüssel etwas mehr Kohle, aber das Gebläse erleichtert doch einiges.
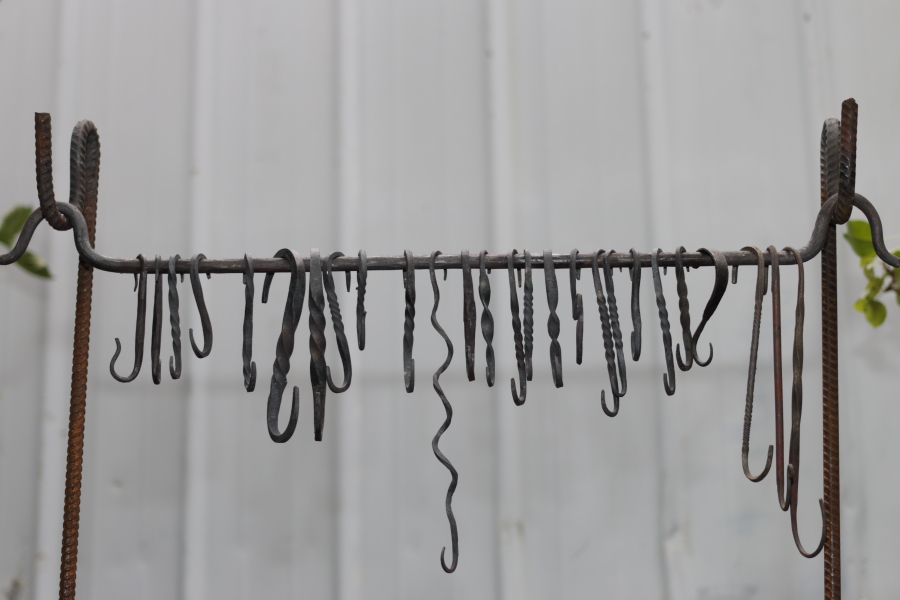
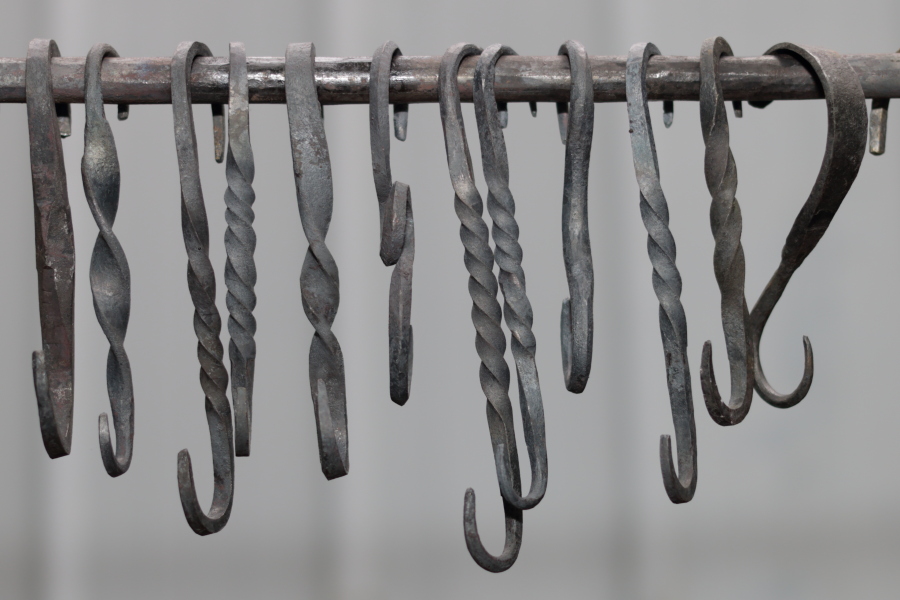
Der Hakenständer ist dann am Wochenende auf der „kleinen“ Esse entstanden. Durch ihre flache Feuerschüssel ist sie für die Bearbeitung langer Teile besser geeignet, und zudem auch sparsamer im Kohleverbrauch. Allerdings ist sie auch etwas anstrengender, da sie als echte Feldesse natürlich ein fuß-betriebenes Gebläse hat … und so das Feuer nicht einfach von alleine brennt.

Dieser erste „echte“ Beitrag in der Kategorie ‚Feuer‘ soll nicht nur die Ergebnisse des Anschmiedens zeigen, sondern darf auch einen Einblick in ihre Entstehung geben:
Ein kleines Timelapse-Video zeigt mich nachmittags bei knapp 30°C an der großen Esse.

This June after a one year’s forced break it was time again to fire the forge.
To break myself in, I started with the bigger forge since she has an electric blower. Due to her deeper fire bowl she burns more coal, but the automatic blower facilitates the work considerably.
Now this weekend I made the the rack to display the hooks, this time on my small forge. Her shallow fire bowl is not only more economical on coal consumption, but it also eases heating long rods. However, working with the small forge is a bit more demanding, since she is a real field forge with a foot-powered, belt-driven blower … where the fire won’t stay ablaze by itself.

This first „true“ entry in the ‚Fire‘ category will not only show the results of my first forgings after the break, but also will give a little insight into the doing:
There is a short timelapse showing the bigger forge and me working in the afternoon at about 85°F.


ralF bei der Arbeit / Me at work


Alle Haken auf einmal / The hooks all together


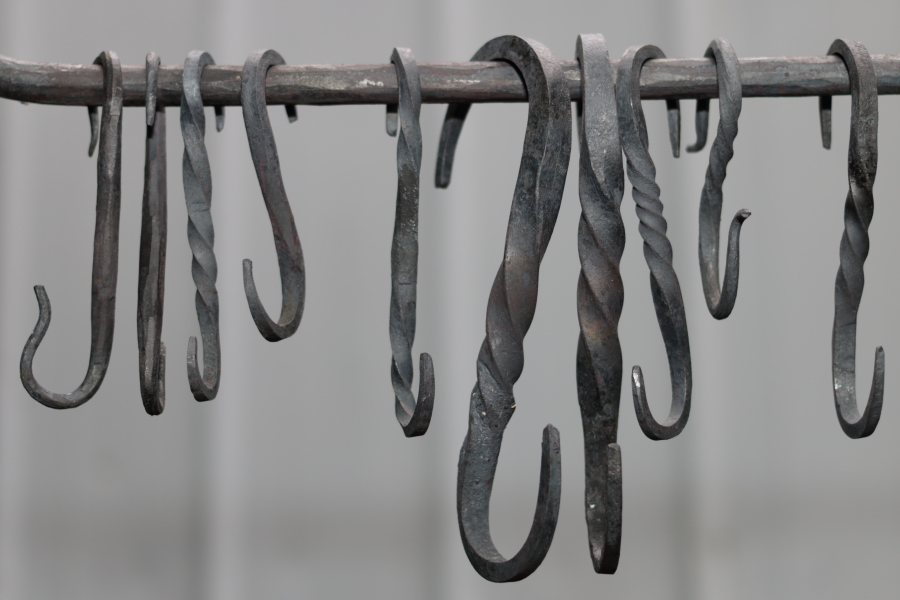
… und die kürzeren Haken nochmal etwas näher
… and the shorter hooks from a little closer


Interesse geweckt … du/ihr/Sie braucht auch Haken … dann einfach mailen, Wunsch äußern oder Preis anfragen:
ralf {punkt} selbst {ätt} ralf-mit-f {punkt} com

Caught your interest … you also want a hook … just mail me, express your wish or simply ask for a price:
ralf {dot} selbst {at} ralf-mit-f {dot} com


Alle Inhalte sofern nicht anders vermerkt / unless otherwise noted, any content: © ralf-mit-f, Ralf Schreiner

Das große Fressen / The Great Feast

Vor ein paar Tagen haben wir wieder Melone gegessen … nur die war ein wenig größer als die versammelten Mägen 🙂
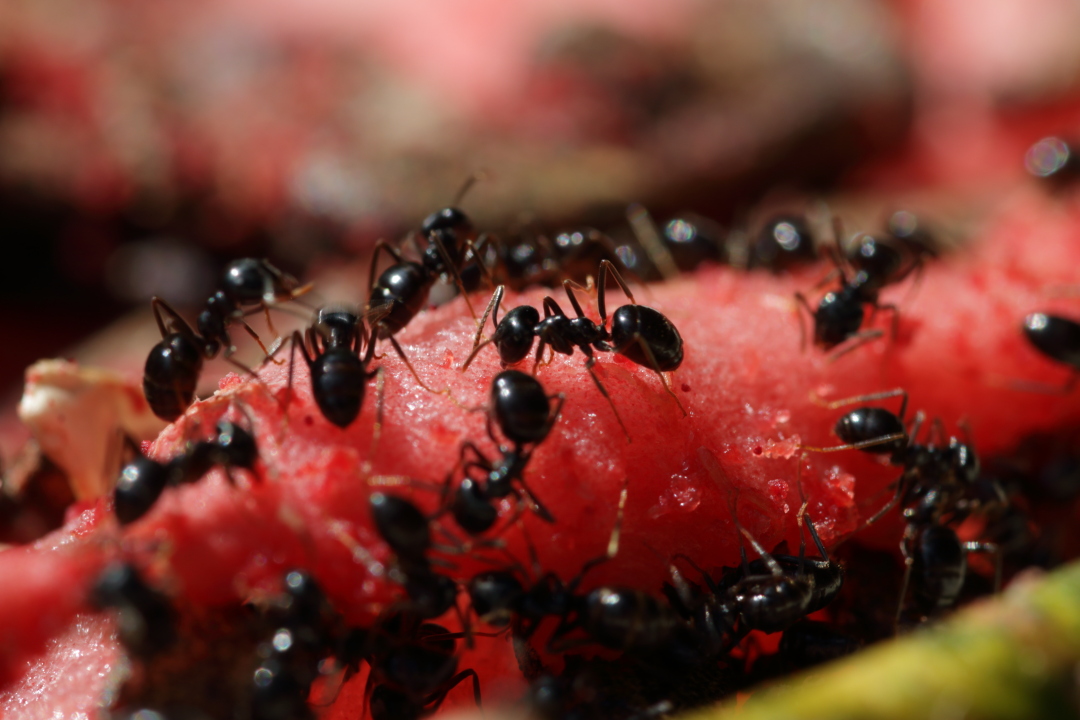
Also dachten wir, wir tun unseren Vögeln im Garten was Gutes und lassen sie die Melone und vor Allem ihre Kerne aufpicken. Was wir nicht erwartet haben, war, wie schnell andere Gartenbewohner riechen, was es da Leckeres gibt.
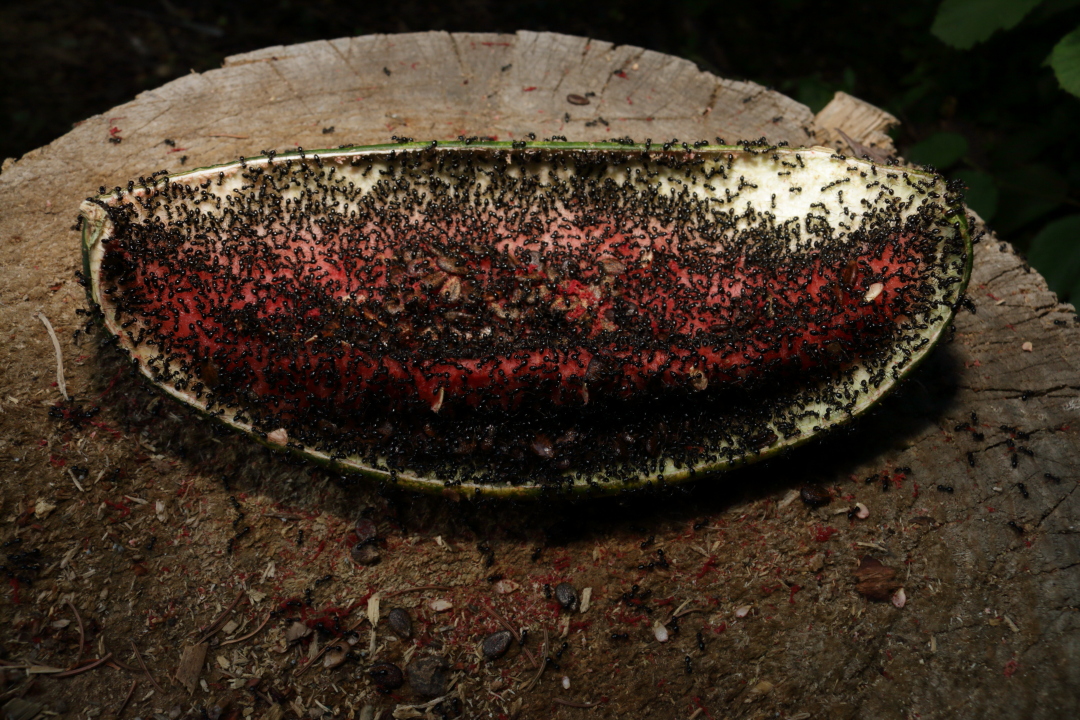
Und so begann das Große Fressen …

Some days ago we had watermelon for supper … sadly the melon was a fair deal bigger than our collected appetite 🙂
So we intended to give the birds in the garden a treat, and let them pick the melon, and especially the many seeds. But what we didn’t expect was the perfectly fast sense of smell of some other garden residents.
And so the Great Feast began …


Nach 24 Stunden … / T + 24h …


… das Ameisenvolk bei der „Arbeit“ / … the ant colony at „work“


Nach 36 Stunden … / T + 36h …


… immer noch schwer beschäftigt / … still very busy


Nach 42 Stunden … / T + 42h …


… erfolgreiches Fressen wird sichtbar / … successful munching becomes obvious


Nach 48 Stunden … / T + 48h …


… das Ende ist in Sicht / … the end’s in sight


Nach 60 Stunden … / T + 60h …


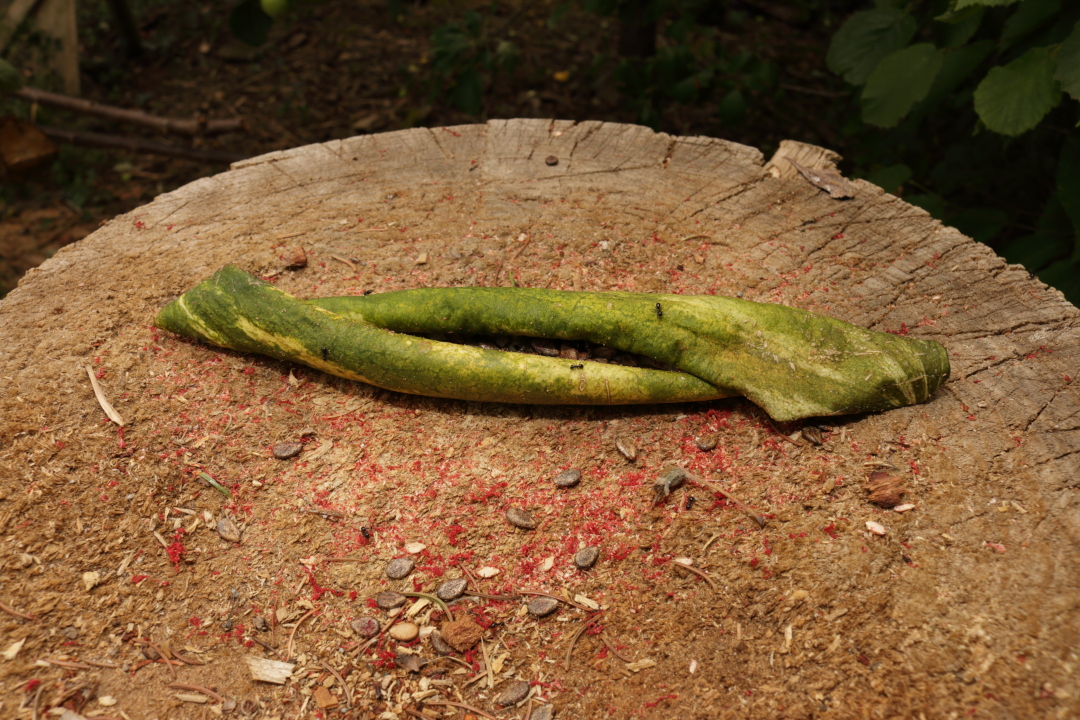
… die letzten Krümel / … the last crumbs


Nach 72 Stunden … das Buffet ist geschlossen 🙂
T + 72h … buffet is closed 🙂


Alle Inhalte sofern nicht anders vermerkt / unless otherwise noted, any content: © ralf-mit-f, Ralf Schreiner

Ganz nah dran … am Öchsle

Wie schon im vorhergehenden Beitrag erwähnt, war ich am vergangenen Wochenende an zwei Orten, die einer „näheren Betrachtung“ lohnen.
Am Samstag war das, wie sollte es anders sein, eine Schmalspurbahn … das Öchsle.

As mentioned in my previuous post, last weekend I’ve been at two locations, that I had to take under „closer examination“.
On Saturdays I’ve been at a, could it be otherwise, narrow gauge railroad … the „Öchsle„.


Radabdruck auf dem Schienenkopf / Wheelprint on the rail head


Alte Farbe / Old paint


Moos und Flechten / Moss and lichen


Rostige Schwelle / Rusty tie


Rost auf der Schwelle / Rust on the tie


Mehr alte Farbe / More old paint


Am Wasserkran / At the standpipe


Biotop zwischen Stahl und Stein
Biotopia in the middle of steel and stone


In der Schranken-Glocke / Inside the railway gate’s bell


Im Seiltrieb / Inside the wire drive


Im Achslager / Inside the axle box


Leider war die frisch aufgearbeitete Öchsle-Lok 99 633 nicht fahrbereit. Daher hier „nur“ ihr Kreuzkopf im Werkstattlicht.
Sadly the newly overhauled 0-4-4-0T #99 633, one of the original locomotives of this line, was not operable. Therefore I „only“ shot her crosshead under workshop light.


Wenigstens ein Dampfbild muss sein
At least one steam photo is a must


Alle Inhalte / any content: © ralf-mit-f, Ralf Schreiner

Ganz nah dran … am Botanicum Ulm

Das letzte Wochenende führte gleich zu zwei Zielen, die man mal ganz aus der Nähe betrachten kann:
Nach der Eisenbahn kam dann am Sonntag der Besuch im Botanischen Garten in Ulm.

Noch ein kleiner Hinweis:
Da ich kein Pflanzenexperte und schon gar kein Botaniker bin, werde ich bei den folgenden Fotos darauf verzichten, sie mit Pflanzennamen beschreiben … es sei denn, ich bin mir ganz und gar sicher, zu wissen, was ich fotografiert habe 🙂

Last weekend saw me at two locations, that were worth to take some closer looks:
Railroading Saturday was followed on Sundays with Ulm University’s Botanical Gardens.

But please allow me a slight lead:
Since I am far away from being a phyto-expert or even a botanist, I’ll better pass on giving plant names in foto descriptions … unless I am absolutely sure to know what I photographed 🙂


In der Blüte / Inside a flower


Schlafmohn-Blüte / Flower of the Opium Poppy


Römische Kamille … nach dem Regen / English Chamomile … after some rain


In einer anderen Blüte / Inside another flower


Fingerhut / Foxglove


Hummel im Klee / Bumblebee on clover


Verwittertes Holz / Some old rotten wood


Neuses Leben auf altem Holz / Old wood carrying new life


Ein Blatt im Fluss / Flowing around a leaf


Holunder 1 / Elderberry 1


Holunder 2 / Elderberry 2


Flechte / Lichen


Junges Leben / New Life


Noch eine Hummel / Another bumblebee


Mitten im Weg 🙂 / Just got in the way 🙂


Alle Inhalte / any content: © ralf-mit-f, Ralf Schreiner

Experimente II – Der Baum von „innen“

Neulich war ich mit meinem Fisheye-Objektiv unterwegs, als mir eine Hängeweide „über den Weg gelaufen“ ist. Unter der Weide lud eine Hängematte zum – kreativen – Entspannen ein.

Recently when I was out with my fisheye-lens, a willow tree came across my way. Beneath the tree a hammock asked to – creatively – relax.


Bild / image: © Claudia Maria Schreiner, 2015

Unter dem Baum kam ich auf die Idee, ein spontanes Kugelpanorama zu fotografieren. Leider hatte ich aber weder den Panoramakopf noch sonstige Hilfsmittel dabei, um die Kamera im Nodalpunkt zu drehen. So musste ich mich freihändig am Panorama versuchen.

Beim späteren Stiching hat sich dann gezeigt, dass die Überlappung der Einzelbilder nicht ganz optimal war. So musste ich die Panoramakuppel und die Verbindung der beiden Bildzeilen komplett selbst referenzieren. Zahlreiche Äste haben das noch ganz gut ermöglicht. Lediglich der Stamm der Weide stellte ein unüberwindliches Hindernis dar und im Ergebnis zu dünn ausgefallen.
Da das Panorama aber durch die vielen Ästen gerade in der Kuppel interessant ist, habe ich mich entschieden, es trotz dieses Fehlers aufzuheben und zu zeigen.

Beim Betrachten ist es also besonders empfehlenswert, sich direkt nach oben zu bewegen und erst dann das Panorama zu rotieren.
Und hier nun viel Spass beim Drehwurm 🙂

Beneath the tree I came up with the idea to spontaneously shoot a panoramic view. Unfortunately I neither carried my panoramic head nor any other tool, to rotate the camera around the optical pivot point. Therefore I had to try to shoot it unguided.

Later during stiching it turned out, that the single images’s overlap was less-than-ideal. Thus I had to find any reference points for the panorama dome and the connection of the two rows of images by hand. Numerous tree branches facilitated this task. Only the willow trunk presented a major obstacle and resulted in quite a slim rendering in the final view.
Considering that the many branches made an especially interesting panoramic dome, I decided to show the interactive panorama despite its faults.

Therefore it is advisable to immediately move up to the panorama’s crown and only then start to rotate the panorama or gradually spiral down.
So for now, enjoy getting giddy 🙂

Ein Klick auf das Panoramabild öffnet das Kugelpanorama
Click the images to open an interactive full sphere panorama


Alle Inhalte sofern nicht anders vermerkt / unless otherwise noted, any content: © ralf-mit-f, Ralf Schreiner

Experimente I – Infrarotfotografie

Angeregt durch einen Zeitschriftenartikel über Infrarot- und Falschfarben-Fotografie habe ich mir einen 715nm-Filter (Heliopan RG 715) gekauft und direkt ein erstes Bild damit gemacht.
Da ich das Bild „freihändig“ aufgenommen habe, habe ich zunächst auf ein ausgeglichenes Histogramm verzichtet. Dadurch ist neben einer eigentlich guten Grün- und Blauverteilung leider eine rechts grenzwertige rote Spitze entstanden:

Inspired by an article on infrared and pseudocolor photography I bought a 715nm infrared filter (Heliopan RG 715), and immediately took an photo.
Since I took the photo free-handed, I did it without paying attention to a balanced histogram. As a result the blues and greens are distributed quite well, while the reds peek to the right limit:


Aufnahme / shot with: Canon EOS 6D, Canon EF 50mm f/1.8, ISO 100, f/5.0, 4.0s, Heliopan RG 715

Um eine korrekte Belichtung bei Fotografie mit IR-Filtern zu erhalten, ist es wichtig, die Belichtungsmessung auf dem Bildsensor durchzuführen. Nur so wird vom Sensor auch das unsichtbare IR-Licht ausgewertet, das den Filter weiter ungehindert passieren kann. Eine Belichtungsmessung über den Spiegel im optischen Sucher würde nur das sichtbare Restlicht berücksichtigen. Daher muss für diese Art der Belichtungsmessung die verwendete DSLR einen Live-View-Modus besitzen.
Für die weitere Bearbeitung ist es zudem zwingend erforderlich, das Bild als RAW-Datei aufzunehmen. Nur so besteht die Möglichkeit, das Bild bereits vor der Bearbeitung in z.B. Photoshop entsprechend zu entwickeln.

When taking a photo with an infrared filter it is essential to meter the correct exposure directly on the image sensor. This is the only way to make sure, that also the invisible infrared light still passing the filter will be taken into account. Metering exposure with the optical viewfinder, and thus reflected by DSLR’s mirror, would only regard the sparsely remaining visible light. Considering this, only DSLRs with live-view-option are suitable for this kind of infrared photography.
Since these images require further processing, it is also essential to save the image to a RAW file. This is the only way to process the photo before photoshopping the image file.


Trotz des eingangs erwähnten sub-optimalen Histogramms und der zum Aufnahmezeitpunkt vorhandenen Bewölkung lässt sich mit dieser ersten Testaufnahme hervorragend spielen.
So habe ich die RAW-Datei zuerst im Canon-eigenen RAW-Konverter mit Standard-Einstellungen entwickelt. Danach habe ich im Photoshop über mehrere Bearbeitungsebenen Anpassungen am Histogramm versucht und letztlich den roten und blauen Farbkanal getauscht. Die abschließende Konvertierung in ein Schwarzweißbild hat zwar zu der Infrarot typischen Helligkeitsverteilung geführt, aber das Ergebnis hat mich nicht wirklich überzeugt.

Daher habe ich der RAW-Datei eine zweite Chance gegeben und sie mit RawTherapee (http://rawtherapee.com/) entwickelt.
Im ersten Schritt habe ich im ColorToning die RGB-Kurve frei angepasst, sodass einerseits die rote Histogrammspitze entzerrt wurde und andererseits blau und grün keine neuen Grenzspitzen aufgebaut haben.
Im zweiten Schritt habe ich dann den roten und den blauen Kanal zu 100% getauscht.
Da ich mit diesem Kanaltausch noch nicht zufrieden war, habe ich ihn überbetont, indem ich jeweils die Kanalfarbe auf -100% und die Tauschfarbe auf 200% (Red=-100;0;200; / Blue=200;0;-100;) gesetzt habe.
Damit hatte ich dieses Zwischenergebnis erreicht:

Despite the abovementioned somewhat less than perfect histogram, and a cloudy sky when the picture was taken, this first test shot offers an ideal playground.
At first I used Canon’s own RAW converter (Digital Photo Professional) to process the photo with plain defaults. Afterwards I used several adjustment layers in Photoshop to first manipulate the color balance and finally swapped the red with the blue channel. A conclusive conversion into a monochrome image resulted in the expected brightness distribution typical of infrared images, but the result was not too satisfying.

Therefore the original RAW file had a second chance, and was processed with RawTherapee (http://rawtherapee.com/).
The first step was to freehandedly adjust the RGB curve of the colortoning until on one hand I had rectified the red channel’s peek, and on the other didn’t build up new peeks with the greens and blues.
The second step called for a 100% swap of the red and blue channels.
Since this didn’t satisfy me, I exaggerated the swap by setting the channels‘ original color to -100%, and the swapped color to +200% (Red=-100;0;200; / Blue=200;0;-100;).
And this is the intermediate result:

Auf dieser Basis habe ich mit Lab-Anpassungen (Helligkeit -10%, Kontrast +15%, Farbsättigung -75%) eine Sepia-Tonung erreicht. Damit diese nicht zu „weichgespült“ aussah, habe ich RawTherapee angewiesen, Farbverschiebungen zu vermeiden.
Und hier ist nun das Endergebnis:

Based on these pseudo colors I adjusted the luminance settings to brightness -10%, contrast +15%, and saturation -75%, resulting in a sepia toned image. Because this image looked a bit too softened I additionally prevented color shift.
So here is the final result:


Alle Inhalte sofern nicht anders vermerkt / unless otherwise noted, any content: © ralf-mit-f, Ralf Schreiner

Ganz nah dran … am Alb-Bähnle

Ein Ausflug auf die Höhen der Schwäbischen Alb ist erst mit einem Besuch beim Alb Bähnle so richtig komplett.
Bei meinem inzwischen fünften Besuch war es nun endlich an der Zeit, auch bei dieser Schmalspur-Bahn einmal ganz nah dran zu sein, ganz genau hinzuschauen.
Hier also meine etwas näheren Eindrücke – teilweise auch mit einem Foto vom „Making-of“.

Visiting the Swabian Jura can not be complete without having seen the Alb Bähnle.
When recently being on my fifth visit to this narrow gauge line, I thought, it was about time to look really closely at this railroad.
So here are my closer impressions – partly also showing the making-of.


Befestigung der Pufferplatte / The buffer-plate attachment


Die Herzstückspitze / Tip of the frog

Um dieses Bild machen zu können, musste der Foto über Kopf im Stativ gehalten werden, während ein Bein des Stativs zur Stabilisierung etwas weiter abgespreizt war.
To take this shot I had to mount the camera upside-down to the tripod, while one of the tripod’s legs was spread a little farther apart to gain more stability.


Hammerkopfschraube / Hammer-head bolt


Schraubensicherung / Screw locking device

Bei diesem Foto war vor Allem der Stativ-Standort eine Herausforderung. Halb im Schotter, halb im Graben und dazwischen jede Menge Baumschnitt …
The challenge when taking this photo was mostly to find a stable position for the tripod … half on the ballast, half in the ditch, and tree cuttings all around.


Gut gefetteter Puffer / Well greased buffer


Geschlitzter Schienenfuß / A notched rail-base

Und wieder durfte der Foto über Kopf abhängen 🙂
Again the camera hung around upside-down 🙂


Um den Fels gekurvt / Around the rock-wall

Panorama aus zwei Aufnahmen mit Sigma 15mm Diagonal-Fisheye,
zusammengesetzt in PanoramaStudio 2 Pro
Panoramic view stitched from two images taken with a Sigma 15mm Diagonal-Fisheye,
and processed through PanoramaStudio 2 Pro


Alte Schwelle / An old tie

Eine kleine Klettertour auf einen Stapel alter Schwellen brachte dieses – ausnahmsweise HDR-bearbeitete – Biotop hervor, während im Hintergrund ein Regionalexpress der Deutschen Bahn abfuhr.
A quick climb onto a stack of old ties revealed this – for once HDR enhanced – biotope, while a German Railway’s semi-fast train departed in the background.


Im Schlusslicht / Inside a tail light


Die Haltegabel / The cradle

Eine Besonderheit einiger Schmalspurbahnen war die Möglichkeit, normalspurige Waggons auf sogenannten Rollböcken befördern zu können. Diese Rollböcke wurden in speziellen Gruben unter die Achsen der normalspurigen Wagen gerollt und dann mit der Haltegabel fixiert. So konnte der normalspurige Wagen auf den Rollböcken zu seinem Zielort gebracht werden.
A device called „carrier truck“ is a special feature of several narrow gauge railways to facilitate the transfer of standard gauge cars on narrower track. In special transfer-pits these carrier trucks were positioned below the standard gauge car’s axles, then the cradles were tilted up and fixed to the axles. So the standard gauge car could ride to its narrow gauge destination.


Weichenstellstange / Switch rod


Alle Inhalte sofern nicht anders vermerkt / unless otherwise noted, any content: © ralf-mit-f, Ralf Schreiner

Ganz nah dran … an Feldbahnen

40 Jahre Frankfurter Feldbahnmuseum
Grund genug, einmal ganz genau auf die Details zu schauen … ohne dabei viele Worte zu machen:

40th anniversary of the Frankfurter Feldbahnmuseum
What better could be the reason to closely examine the details … without unnecessary words:


Decauville Hauptrahmenträger / Decauville bolster


Muldenverriegelung / V-tipper latch
Focus-stack with PICOLAY


Lokomotivkohle / Fuel coal


Kupplungsschacht / Coupler pocket


Niet / Rivet


Rost / Rust


Koks / Coke


Bremsgestänge / Break gear


Achslager / Axle box


Schwelle / Tie, or sleeper


Muffe / Fitting


Kuppelpilz / Coupler head


Schwingenstein / Link block


Zu guter Letzt, ganz nah dran mal anders: Deutz’sches Fahrwerkspanorama
Last but not least, a somewhat different close-up view: Deutz‘ chassis panorama


Alle Inhalte sofern nicht anders vermerkt / unless otherwise noted, any content: © ralf-mit-f, Ralf Schreiner